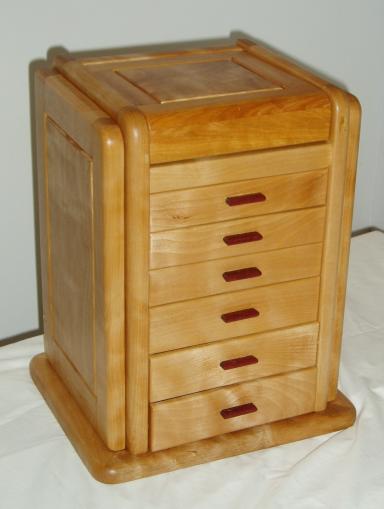
Marilyn's Jewellery Chest
Back to Luigi's woodworking home page
 Marilyn complained that, after being with a woodworker for 17 years, she still stored her jewellery in a cardboard box. (A slight exaggeration - it's actually a reptilian leather covered antique cardboard box and a few small baskets). So, in November 2003, I ordered Doug Stowe's jewellery box making books (Creating Beautiful Boxes with Inlay Techniques and Simply Beautiful Boxes), intending the box to be her Christmas present. When the books arrived, I asked her to pick which one she wanted.
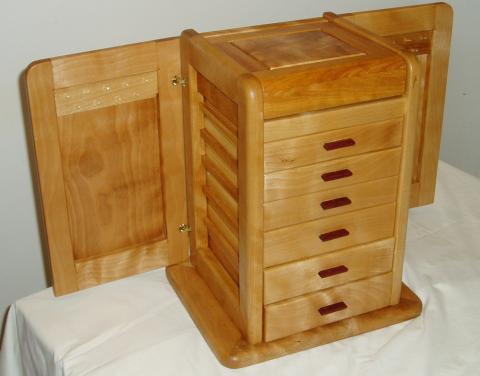
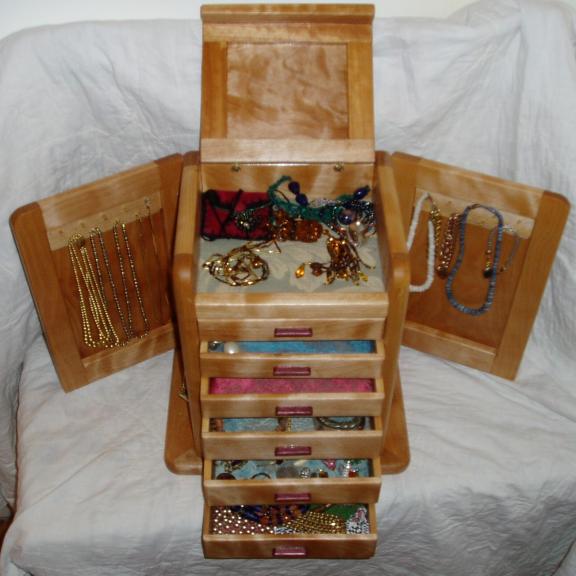
She, of course, picked the most complicated and challenging one (Chapter 16 in the Creating Beautiful Boxes with Inlay Techniques book): six drawers, a top compartment with an opening lid and a door on each side that allows hanging necklaces - 96 separate tiny pieces of wood (I counted them), each one needing to be accurately milled and cut. But then, I figured I was not a beginner and I was up to an interesting challenge. Hah! Some like to say: a good woodworker is not someone who doesn't make mistakes, but one who knows how to fix them. Well, I must be really good 'cause I'm always figuring out ways of fixing mistakes.
Like Groggy said: "I'm laughing at you Luigi, you shoulda bought the box instead of the books!"
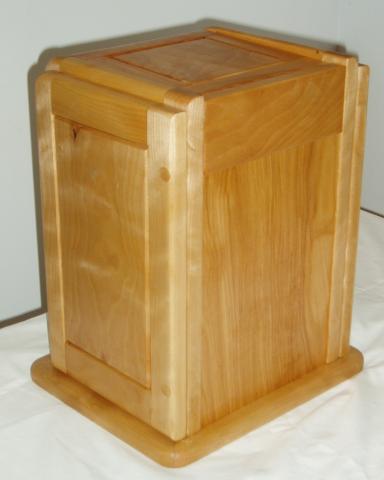
Doug's design called for fiddleback maple, but, at first, I thought of making the frames out of purpleheart and the panels out of a rather bland but severely twisted piece of maple. Marilyn does like purpleheart - I once bought a piece as a gift to her and brought it home and asked her what she wanted me to make out of it. I thought of using it for this box. But it was not really suitable as it is only 25/32" and does have a few divots and some snipe in it. Besides, after some though, I realized that that combination of woods wouldn't work.
I looked around and realized I had a nice 12' long piece of birch with a pretty wild flame figure. The former owner of a local lumberyard sold it to me quite a few years ago as red oak! I realized that it was birch when I skip-planed it, but decided to keep it. I ended up using the birch just for the appearance parts. I also used the seriously twisted maple board I had for the drawer sides.
First, I had to figure out how to the thing was put together. While Doug's book provided a good cut-list and fairly detailed instructions, I still needed to get it straight in my head. So I drew it up on a little CAD program. I also discovered what I thought were discrepancies in the cut list. So I emailed Doug Stowe, and he responded promptly with some explanations for the ones where I was confused and told me that he had been trying to get the publisher to fix a few mistakes for quite a while.
 So I ordered the hardware (barrel hinges) from Lee Valley and started milling and cutting the wood. But that proved the first mistake. As Doug Stowe told me:
It is a challenging piece, and it is best to start making it a bit at a time and adjust any measurements as you go. Not a good idea to say, "This is my
cut list and I'm going to cut lots of wood and then see if things fit...."
Prophetic words. I have to say that Doug was quite gracious in answering numerous questions promptly.
After milling most of the wood, mortises were the first step. A bit of plastic had broken off from my Bosch router edge guide. I tried gluing it back with superglue but it broke off again as soon as I tried tightening the screw that holds one of the two round shafts. ABS cement did not work either, so I ended up fabricating and screwing on a metal strap. Then I marked the mortises on the door and carcase stiles. Made (or rather rebuilt) the mortising jig, and adjusted the router & guide by testing on a piece of scrap.
As I was cutting the shoulders on the tenons for the sides and doors using a sled on my TS and somehow the stop (should be called a slipper) moved slightly and screwed up the VERY LAST TENON SHOULDER I WAS CUTTING! So I had to recut all the shoulders, making the whole thing smaller by a couple of mils. Consequently, the drawers had to be shorter and the lid narrower. The second time around, I held the slipper with two big f.... C/G-clamps/cramps (your choice) instead of just one little one.
Then I cut the tenons for the front and rear stretchers at 3/4" like the others, instead of 1/2" like the plans called for. I blame it all on Marilyn as she came into the shop and interrupted me as I was cutting the tenon cheeks. I then immediately cut the cheeks on the two pieces without thinking. I had put them on the bench instead of the saw to make sure that I would think of lowering the saw blade before cutting those two. She came in, we had a chat, and then I forgot and grabbed the two pieces and cut them. It was only later that I realized that I had cut them wrong. (I know it's not her fault, I just need someone else to blame.)
With some judicious (and injudicious) paring, the frames for the sides and doors fit nicely, flat and almost square. Anyway, no one will notice the shavings I strategically glued to some of the tenons. The only issue is that the whole thing will be 1/2" narrower than Doug's plans, as I cut tenons on two cross pieces at 3/4" instead of 1/2".
 The next mistake was in drilling the holes for the barrel hinges. I forgot to readjust the depth gauge on the drill press and drilled one of the holes right through on one of the doors. So I drilled out the other ones and eventually had to plug them before finishing.
Things went relatively smoothly after that: making tiny drawer guides, routing out the slots for the guides and gluing up the carcase. But I later discovered that I had not glued the carcase up perfectly square, which caused a few problems in fitting the drawers and especially the lid.
However, the tenons and mortises in the lid did not fit well, so I did not glue it up. My various attempts at making them fit ended up cracking one of the rails. Argh!
By then, it was already January 2004. The tenants in our basement suite had moved out and I decided to move my office into the old suite. So I temporarily abandoned the project, intending to have it done by Marilyn's birthday in February. I had to make a bunch of built in desks, tables and shelving for the new office. By then, my work work was seriously behind schedule and I had to scramble to get a number of projects finished. So I did not get the box done by Marilyn's birthday. After that came our short summer, a couple of sailing trip off Vancouver Island, visitors from Italy, and a tiling disaster in the Galleria. I didn't even get to go moose hunting.
So, in November 2004, I start again on the jewellery chest. First task was to remake the lid. I made 2 of everything just to be sure. Everything fit properly this time. I did not even need to pare the tenons. Then came the drawers. I needed to make rabbets/tenons and dado/mortises. I got smart and milled two sets of drawers. Then came the task of cutting a dado in the side of each drawer and fitting it so the drawers operated smoothly without binding or interfering with each other. While laborious, this went relatively well. I only had to recut one slot. But the height of the slots was different for each drawer because of the lack of square. So it called for some precise measurement. I also made the tiny drawer pulls out of purpleheart.
The final step was installing the hinges. But before that, I put on two coats of tung oil after sanding to 240 grit, as Doug suggested, so the finish wouldn't get on the hardware. As there was a bit of tearout on a few spots, I experimented with different fillers. Doug Stowe suggested sawdust mixed with Duco cement, which turned out to be completely unobtainable in Whitehorse. So I experimented with the old stand-by shellac, and with lacquer, polyester resin, model cement. All resulted in repairs that were too dark and that stuck out like a sore thumb when covered with tung oil. Finally, in desperation, I tried some "maple" coloured wood filler I happened to have around. It worked great and the repairs were almost invisible after applying the tung oil.
 Then, on December 23, I was ready for the final step: installing the hinges and the brass pins for hanging necklaces. The barrel hinges on the doors went in OK, although I had to bang them in. This is surprising as they supposedly required a 12mm drill bit, which I had purchased and used. But the door closed well thanks to Doug Stowe's instructions on how to drill them accurately, I only had to do a bit of sanding on the bottom rail of one door because it was rubbing. The lid was a different matter. After banging the hinges in, I discovered that one side of the lid was 1/8" too high and did not sit on the front stretcher. Argh! I had installed the rear stretcher off square, about 1/8" too high on one side.
I tried removing the hinges, but one broke as I was trying to twist it out. On December 24th, I went to Crappy Tire, got a roll of wrapping paper, wrapped it up and put it under the tree. So she got the jewellery chest, but with a missing hinge and an inoperable lid.
Back to Lee Valley's web site to order new hinges. When they got here, I experimented with a slightly bigger hole (13/32" instead of 10mm). The hinges went in perfectly, and could actually come out!! But I had to plug the old hole & reposition it. To find the position of the new hole, I inserted a 3/8" dowel centre in one hole. I had to put a few wraps of tape around it so it would be snug in the 10mm hole. The positioning proved accurate. Some sanding of the back cross-piece after trimming it square, a couple of coats of tung oil and the chest was finished on January 15, 2005.
Also, I lined the bottom of the drawers with pieces of upholstery fabric samples. They are glued on 1/8" (3mm) Baltic birch plywood cut about 1/16" smaller than the bottom of the drawer. I cut the fabric about 1/4 or 3/8" bigger than the plywood all around, put the fabric face down on newspaper, positioned the plywood on top of the "bad" side of the fabric, sprayed some spray adhesive and folded over the edges to glue them to the "back" of the plywood. No fuss, no mess lining.
Oh, it's about 14 inches high and eight inches wide.
Back to Luigi's woodworking home page
© 2005 Luigi Zanasi, Whitehorse, Yukon.
The background is western birch from Romeyn Hough's The American Woods:
exhibited by actual specimens and with copious explanatory text.