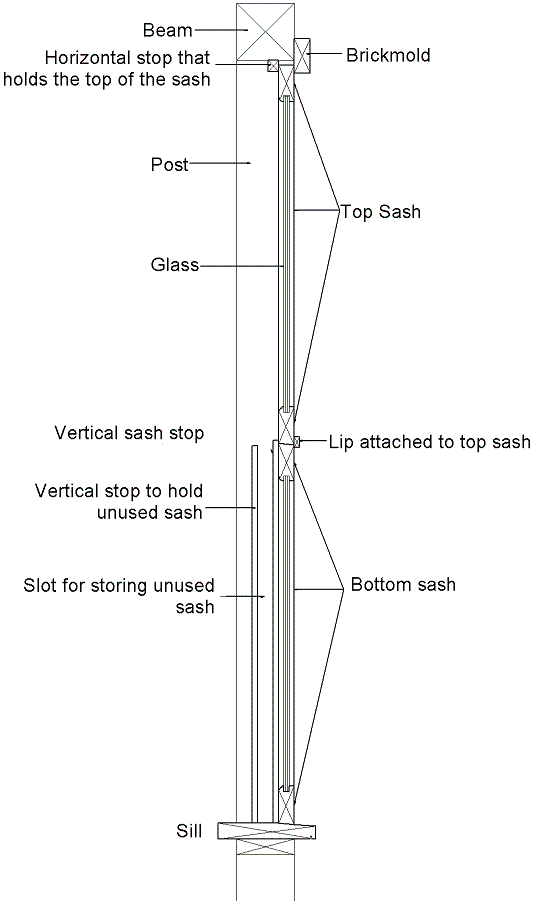
Brickmold (architrave) & Weatherstripping
The brickmold is 1" by 3" cedar, screwed into the vertical posts and the horizontal beam. The portion that protrudes is weatherstripped using 3/4" by 1/4" EPDM foam rubber. At first the windows were sticking to the rubber, but silicone spray fixed that. There is also a strip of EPDM foam rubber between the top and bottom sash and along the bottom of the lower sash so that there is no leakage between it and the sill.
Bottom sash
The bottom window sash slides into a slot created by the brickmould and a 1/2" by 3/4" vertical stop. The distance between the brickmold and the stop is 1-9/16" so the sash compresses the EPDM foam set on the brick mould. So the sash is held in place by its stiles (vertical pieces). The top and bottom sort of "float". As is standard practice, the bottom rail of the sash and the sill are bevelled so that water flows. Although the resolution on the picture does not show it, there is a drip slot under the sill.
Top sash
The top sash is held by the horizontal stop (screwed to the beam), the lip that hooks on the bottom window, and the vertical stop which protrudes about 1/2" beyond the top rail of the bottom window. There is no support along the vertical sides. To install the top sash, I push up on it until it clears the bottom sash top rail, push it in place and pull it down so it hooks on the bottom window. The top rail has a small bevel to make it easier to insert into the slot. I did have a problem at first. I had made the stop 3/4" high, which was not enough. The problem stemmed from three causes: the opening was originally 72-1/2", exactly what I needed for two sash exactly 36" high. But shrinkage and the bevel on the sill and bottom rail, as well as the eventual compression of the weatherstripping made one window fall out. Luckily, the glass did not break. So I had to make the horisontal stops bigger.
Storage
I have two sets of top windows: one with glass and the other with screens. So during the summer, the screen is on while the glass goes on during the rest of the year. The unused top sash fits behind the bottom sash. Originally, I had planned on putting 1n a second stop, as the drawing shows. Instead, I ended using screw-in brass shelf supports from Lee Valley. Four of them, two on each post hold the spare sash behind the bottom window. Looks much better than another stop.

For a better view (bigger & clearer) click here